Backup and Restore
Here, we will explain the backup and restore procedures for various files of Apache Solr instances, such as indexes, configuration files, and log files.
Page Sections
- What is Backup?
- Disk Usage and Fees
- To use the backup and restore feature
- Backup method and target
- Create backup now
- Regular Backup
- Setting up a schedule for regular backups
- Restore
- Download
- Deletion of backup data
- Related Topics
What is Backup?
You can easily obtain backups of various files for Apache Solr instances, such as indexes, configuration files, and log files, from the backup screen. Additionally, you can easily download and restore (restore) the backed-up data from the screen.
Please note that in KandaSearch, backups and restores are handled on a project basis. Restore operations can be performed on instances within the same project.
Backups can be used for the following purposes:
- For restoring indexes
- Backing up before making configuration changes
- Regular backups
- Restoring when adding new Apache Solr instances
- Restoring when upgrading Apache Solr
- Restoring when changing plans
- Backing up files for use in other projects (files only)
Disk Usage and Fees
Backup and restore are standard features of KandaSearch.
KandaSearch provides a free quota for disk space used for backups based on your current plan.
If you exceed the free quota, the excess usage will be billed the following month.
Note that the Community plan does not allow backups beyond the free quota.
Here is an explanation of the disk usage and fees for backup data.
Suppose you have a plan that offers a free backup allowance of 1GB per day, and you use a total of two Apache Solr instances: one starting on May 1 (let's call it Instance A) and one starting on May 20 (let's call it Instance B).
The free quota for Instance A in May is 1GB x 31 days = 31GB. The free quota for Instance B in May is 1GB x 12 days = 12GB. Since backups are managed on a project basis, this project will have a total of 43GB of free quota available in May.
This value can be checked in the 'Remaining' section of the 'This month's backup consumption' graph on the backup screen.
For example, if you set the regular backup frequency of Instance A to 'daily' with 1 generations saved, and the backup size per day is 1GB, then the consumption size of Instance A in May can be calculated as 31GB. Since a total of 43GB of free space is available in May, the remaining space can be used for Instance B or as temporary backup storage for Instance A.
As a special use case, if 'on May 21, you create a 40GB backup on Instance A and delete it on the same day, and there are no other uses for Instance A or B in May', then the disk usage for May will be calculated as 'within the free tier'.
Please note that even if you exceed the free tier, backups will continue to be created. It is recommended to regularly check the backup screen and monitor the usage of the free tier.
To use the backup and restore feature
To use backup and restore, follow these steps to access the backup screen:
- Log in to KandaSearch.
- From the list of projects, click on the name of the project you want to access. (To display the list of projects, click on the KandaSearch logo at the top left of the screen.)
- Click on 'Backup' from the left side menu of the project view.
- The backup screen will be displayed.
Backup method and target
Backup methods and list
There are two types of backup methods: automatic backups, which are performed regularly according to the schedule and content set, and manual backups, which are performed manually through the interface.
Backups created using these methods can be viewed on the backup screen.
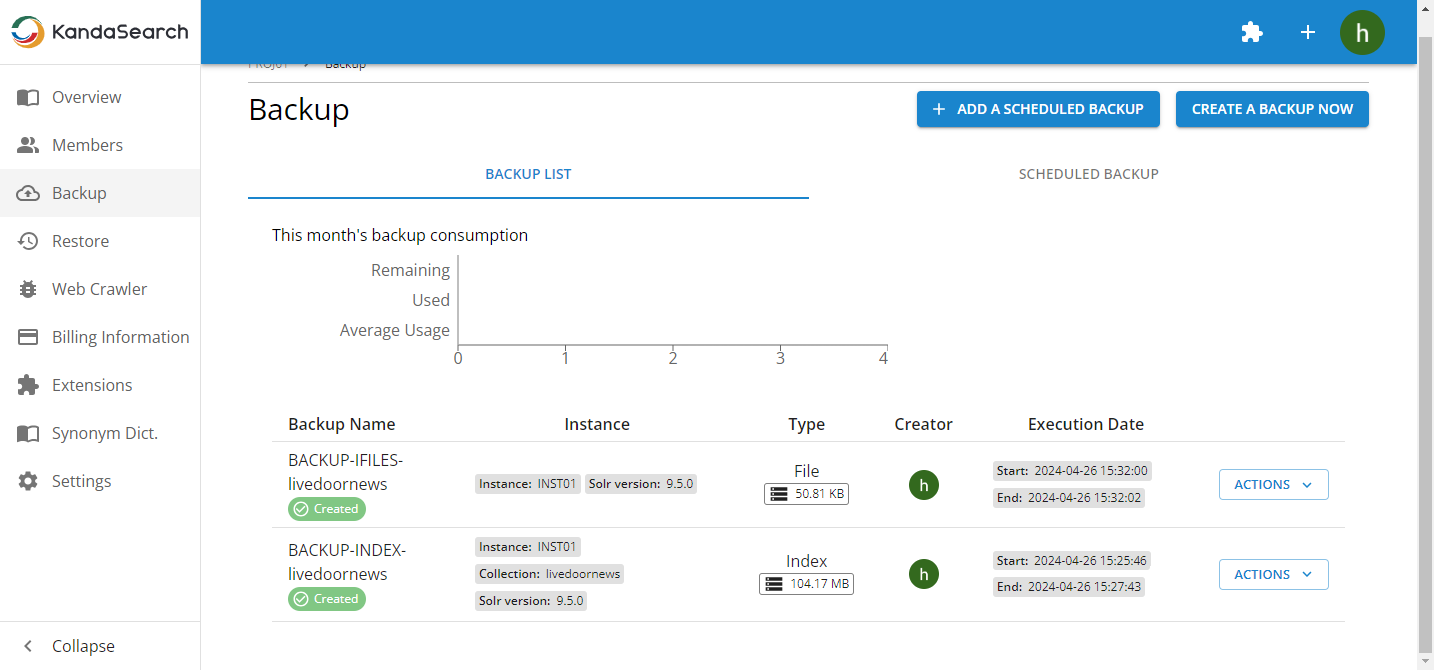
The backup list includes the following items:
- Backup Name: The name specified when creating the backup configuration.
- Instance: The name of the selected instance.
- Node #: The name (number) of the node targeted for backup when selecting 'File' as the type. (For SolrCloud)
- Collection: The name of the selected collection.
- Type: The type of backup target. Either INDEX or FILE.
- Version: The Apache Solr version of the instance being backed up.
- Creator: The icon of the member who performed the backup. Clicking on it reveals the name and email address. If the icon is the KandaSearch logo, it indicates a backup created by scheduled backup.
- Execution Date: The start and end date/time of the backup acquisition.
- Status: The acquisition status of the backup.
- Size: The size of the backup data.
- ACTIONS: Restore, Download (only when the type is FILE), and Delete operations can be performed.
At the top of the backup list, you will find a 'This month's backup consumption' graph, which serves as a guideline for the usage status of the free tier.
- Remaining: The available free tier and remaining for the current month.
- Used: The current disk usage.
- Average Usage: The average usage capacity calculated from the usage up to the current point, representing a one-month average.
Create Backup Now
To manually create a backup immediately, follow these steps:
- Click on 'CREATE A BACKUP NOW' at the top of the backup screen.
- Enter the backup name in the 'Backup Name' field. Japanese characters can be used.
- Select the instance to be backed up in the 'Instance to Backup' field.
- Select the type of backup.
- If backing up indexes, select the collection in the 'Collection to Backup' field.
- If backing up files, specify the files or folders to be included in the backup under the '/solr' folder in the 'Included Files' field, preceded by '/'. Wildcards such as
*can be used here. If unnecessary files are listed in the 'Included Files' field, specify them in the 'Excluded Files' field. Wildcards such as*can also be used here. After specifying the files to be backed up, click 'REFRESH PREVIEW' to confirm that the backup targets are correctly selected. For SolrCloud configurations, select the instance nodes to be targeted. - Finally, click 'CREATE MANUAL BACKUP'.
- The status of the created backup can be checked in the backup list on the backup screen. To see the latest 'Status', refresh the screen.
Examples of settings for 'Included Files' and 'Excluded Files' are as follows:
- Included Files
/log4j2.xml
/solr.in.sh
/data/*
- Excluded Files
/data/lib/*
Regular Backup
If you want to regularly backup automatically, follow these steps:
- Click on 'ADD A SCHEDULED BACKUP' at the top of the backup screen.
- Enter the backup name in the 'Backup Name' field. Japanese characters can be used.
- Select the instance to be backed up in the 'Instance to Backup' field.
- The settings for 'Backup Type' and relevant items are the same as those for 'Create Backup Now' mentioned above.
- In 'Scheduled Backup', specify the frequency and conditions (time, day of the week, date) for each frequency.
- In 'Number of Saved Backups', specify the number of generations to keep. Backups of the specified number of generations will be retained, and backups created before this schedule will be deleted.
- Finally, click 'CREATE BACKUP SCHEDULE'.
- The status of the created backup can be checked in the backup list on the backup screen.
Notes.
- Increasing the number of backup generations will result in a larger disk usage.
Setting up a schedule for regular backups
The schedule for added regular backups can be viewed from the 'SCHEDULED BACKUP' tab on the backup screen.
- The list displays the backup name, instance, node number, type, collection, creator, execution time, and retention count.
- Clicking the edit (pencil) icon allows you to edit the schedule settings for that row (only some items).
- Clicking the delete (trash can) icon allows you to delete the schedule settings for that row. Deleted schedule settings cannot be restored.
Restore
With this feature, you can restore indexes and files using the data backed up. The restoration process from backup is as follows:
- From the list of backups on the backup screen, click on the 'ACTIONS' at the right end of the backup row you want to use for restoration and select 'Restore'.
- Information about the backup at the time of backup (index, file) will be displayed. Confirm that the data to be used for restoration is correct.
- Select the instance to restore to in the 'Restore to Instance' field.
- Click 'RESTORE'.
- Click 'Restore' from the left side menu.
- The list of restoration operations performed so far will be displayed. Verify the status and other details. To delete the history of restoration operations, click the delete (trash can) icon at the right end of the respective row.
IMPORTANT
After performing a restoration (restore), it is not possible to revert to the state before the restoration.
Download
You can download data of type 'File' from the backups.
The download process is as follows:
- From the list of backups on the backup screen, click on the 'ACTIONS' at the right end of the target row and select 'Download'.
- Click 'DOWNLOAD TO PC' to download it to your local PC.
- Click 'DOWNLOAD TO CLOUD' to save it to /solr/_restore on the original instance. You can then view or download the contents from the 'File Manager' in the instance view.
Deletion of backup data
You can delete backup data. By deleting unnecessary backup data, you can effectively utilize the free quota.
The deletion process is as follows:
- From the list of backups on the backup screen, click on the 'ACTIONS' at the right end of the target row and select 'Delete'.
- A deletion confirmation('Delete restore point') screen will appear. Click 'CONFIRM'. Restoration of deleted backups is not possible.
- In the list on the backup screen, the status of the target backup data will change to 'Deleting'. Refresh the screen to confirm that the target backup data has been deleted.