Health Check
Here, we will explain the health check, which is a 'Fault detection' for Apache Solr instances.
Page Sections
- What is a Health Check?
- To utilize Health Check
- Health Check settings and OFF/ON
- Checking Status from the Screen
- Email Notification Settings
- Webhook Notification Settings
- List/Edit/Delete Registered Notification Settings
- Related Topics
What is a Health Check?
In KandaSearch, you can 'Monitor the status'('Fault detection') of Apache Solr instances. This functionality is referred to as Health Check.
The status can be checked on the Health Check screen and through notification settings.
As notification destinations, you can specify email and webhook. Additionally, multiple registrations (such as registering three email notifications and two webhooks) are possible for notification destinations.
The Health Check feature is available on the Standard plan or higher.
To utilize Health Check
To use Health Check, follow these steps to display the Health Check screen:
- Log in to KandaSearch.
- From the list of projects, click on the desired project name. (To display the list of projects, click on the KandaSearch logo at the top left of the screen.)
- From the project overview, click on the name of the instance to be monitored.
- From the left side menu of the instance view, click on 'Health Check'.
- The Health Check screen will be displayed.
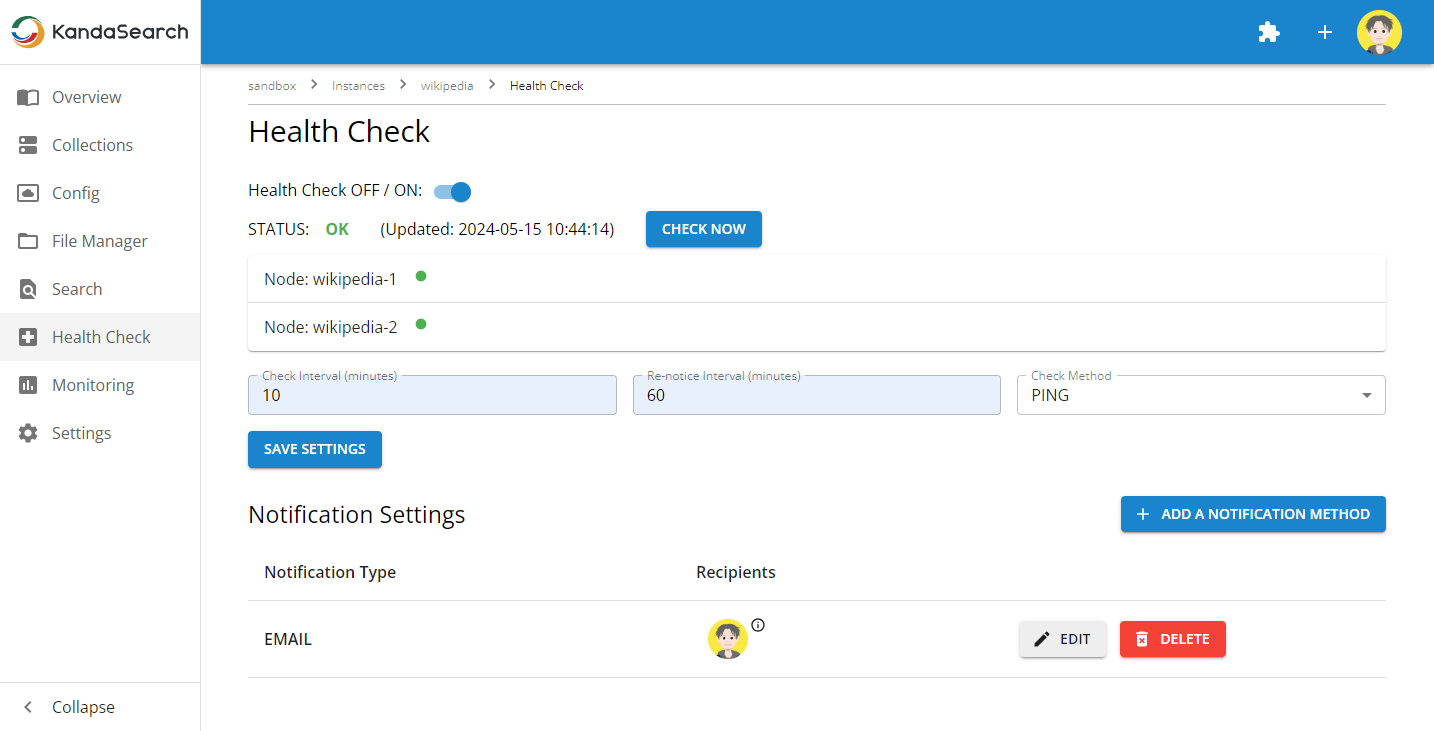
Health Check settings and OFF/ON
By default, Health Check is turned off.
To start 'Health Check', configure the settings and toggle the switch to on.
Settings
Follow these steps to configure settings:
- Specify the Check Interval. Instance checks will be performed at the interval specified here. The unit is minutes.
- Specify the Re-notice Interval. When the status is NG (Not Good), retries will be sent to the notification destination at the interval specified here. The unit is minutes.
- Specify the Check Method. Currently, we support the PING function of Apache Solr.
- Click 'SAVE SETTINGS' to save the settings.
Health Check OFF/ON
To start 'Health Check' based on the conditions specified in the settings, slide the Health Check switch to the right to turn it on.
To stop 'Health Check', slide the Health Check switch to the left to turn it off.
Please note that during the initial monitoring setup, once you save the settings, the switch will automatically turn on.
Checking Status from the Screen
In the status field of the Health Check screen, you can check the status of Apache Solr instances, detection date and time, and the status of each node.
Clicking on 'CHECK NOW' will refresh the information to the latest.
The types of status displayed are as follows:
- OK: The Apache Solr instance is operating normally.
- ERROR: The Apache Solr instance is stopped or an abnormality has occurred.
- NO STATUS: The health check status could not be received.
If an abnormality occurs, check the error code in the message sent to the notification destination, or review the log files from the file management in the instance view.
For SolrCloud configurations, below the status, the node names configuring the SolrCloud will be displayed with indicators. Clicking on a node name allows you to check the details of the collection name and status.
Email Notification Settings
When an anomaly is detected, notification via email is available.
Here's how to set up email notifications:
- Click on "ADD A NOTIFICATION METHOD" within the Health Check screen.
- The 'Create Notification' screen will appear. Select the 'EMAIL' tab (the 'EMAIL' tab is active by default).
- Select the recipient member from 'Project Members'. Once selected, press the ESC key or click on the margin of the 'Create Notification' screen in the background.
- If specifying email addresses explicitly for sending, input the email address in the email address field and click the '+' icon on the right. Repeat this step when specifying multiple email addresses.
- In the 'Email Subject' field of the email settings, enter the subject for the email. Placeholder variables such as
${INSTANCE_NAME}can be used in this field. Drag and drop the desired items from the blue button group displayed at the top. - In the 'Email Body' field of the email settings, enter the notification message body. Placeholder variables such as
${INSTANCE_NAME}can be used in this field. Drag and drop the desired items from the blue button group displayed at the top. - After completing the input, clicking 'SEND TEST EMAIL TO CURRENT USER' will send a test email to the user configuring this setting.
- Finally, click 'CONFIRM'.
Notes.
- The sender's email address is 'no-reply@kandasearch.jp'. On the receiving end, please perform necessary actions such as setting up permission to receive emails to prevent them from being marked as spam.
- In the case of SolrCloud configuration, the 'Errors' placeholder will contain and notify the name of the node where the fault occurred.
Webhook Notification Settings
When an anomaly is detected, notification via Webhook is available.
A webhook is a mechanism to notify in real-time using the HTTP protocol when events occur. It can be used with platforms like Slack.
Here's how to set up webhook notifications:
- Click on 'ADD A NOTIFICATION METHOD' within the Health Check screen.
- The 'Create Notification' screen will appear. Select the 'WEBHOOK' tab.
- In the Webhook URL field, input the URL for the receiving system's webhook.
- In the 'Webhook Message' for notification message, input the body of the notification message. Placeholder variables such as
${INSTANCE_NAME}can be used in this field. Drag and drop the desired items from the blue button group displayed at the top. - After completing the input, clicking 'SEND TEST WEBHOOK MESSAGE' will send a test message via webhook.
- Finally, click 'CONFIRM'.
Notes.
- In the case of SolrCloud configuration, the 'Errors' placeholder will contain and notify the name of the node where the fault occurred.
List/Edit/Delete Registered Notification Settings
List of Registered Notification Settings
You can confirm the list of registered notification settings from the middle part onwards of the Health Check screen.
Edit Registered Notification Settings
The method to edit registered notification settings is as follows:
- Click on 'EDIT' for the row you want to edit.
- Once the 'Edit Notification' screen appears, make the necessary edits and then click 'CONFIRM'.
Delete Registered Notification Settings
The method to delete registered notification settings is as follows:
- Click on 'DELETE' for the row you want to delete.
- Once the 'Notification Deletion Confirmation' screen appears, click 'DELETE'. Deleted notification settings cannot be restored.